
Tkinter(Tk)のGridレイアウトマネージャーは、ウィジェットを行と列のグリッドに配置してくれる。まずは簡単なPythonコード例とその意味から見てみる。
簡単な例
import tkinter as tk
# Tkオブジェクトを作成
root = tk.Tk()
root.title("Grid Layout Example")
# ウィジェットを作成
label1 = tk.Label(root, text="Label 1", bg="lightblue")
label2 = tk.Label(root, text="Label 2", bg="lightgreen")
button1 = tk.Button(root, text="Button 1", bg="lightcoral")
entry1 = tk.Entry(root, bg="lightyellow")
entry2 = tk.Entry(root, bg="lightpink")
# グリッドに配置
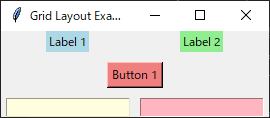
label1.grid(row=0, column=0)
label2.grid(row=0, column=1)
entry1.grid(row=2, column=0, padx=5)
button1.grid(row=1, column=0, columnspan=2, pady=10)
entry2.grid(row=2, column=1, padx=5)
# ウィンドウを表示
root.mainloop()簡単な例のコードの解説
label1.grid(row=0, column=0)
label1という名前のラベルウィジェットをウィンドウの0行目、0列目に配置する。つまり、ウィンドウの左上隅に配置される。
label2.grid(row=0, column=1)
label2という名前のラベルウィジェットをウィンドウの0行目、1列目に配置する。つまり、label1の右隣に配置される。
entry1.grid(row=2, column=0, padx=5)
entry1という名前のエントリーウィジェットをウィンドウの2行目、0列目に配置する。つまり、label1と同じ列にあるが、label2より下に配置される。またpadx=5を使用して、水平方向の余白を追加している。
button1.grid(row=1, column=0, columnspan=2, pady=10)
button1という名前のボタンウィジェットをウィンドウの1行目、0列目に配置する。また、columnspan=2を指定して、ボタンが2つの列にわたるようにしている。合わせてpady=10を使用して、垂直方向の余白を追加している。
entry2.grid(row=2, column=1, padx=5)
entry2という名前のエントリーウィジェットをウィンドウの2行目、1列目に配置する。つまり、entry1の右隣に配置される。またpadx=5を使用して、水平方向の余白を追加している。
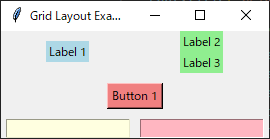
複数の行、列にまたいで配置する
最初の例で、ボタンが2列にまたがって表示されている。複数の行・列をまたいでウィジェットを配置する場合は、columnspanとrowspanを使用する。
columnspan
ウィジェットがグリッド内の何列にわたって配置されるかを指定する。例えば、columnspan=2と指定すると、ウィジェットは現在の列とその右隣の列にわたって配置される。
rowspan
ウィジェットがグリッド内の何行にわたって配置されるかを指定する。例えば、rowspan=2と指定すると、ウィジェットは現在の行とその下の行にわたって配置される。
二つのオプションを同時に利用することももちろん可能。
使用例
# グリッドの行列をまたいで配置
label1.grid(row=0, column=0, rowspan=2)
label2.grid(row=0, column=1)
label3.grid(row=1, column=1)
button1.grid(row=2, column=0, columnspan=2, pady=10)
entry1.grid(row=3, column=0, padx=5)
entry2.grid(row=3, column=1, padx=5)
ウィンドウに合わせて伸縮させる
ウィジェットに対してstickyオプションを使用する。stickyオプションは、ウィジェットが親ウィンドウのどの方向に寄るかを指定する。stickyオプションの値は、N(北)、S(南)、E(東)、W(西)などの方向を示す文字列を指定する。NSEWを組み合わせて、ウィジェットがすべての方向に伸縮するようにするようにできる。
stickyオプションを使用した例

stickyオプションを使用した例のコード
import tkinter as tk

# Tkオブジェクトを作成
root = tk.Tk()
root.title("Grid Layout Example")

# ウィジェットを作成
label1 = tk.Label(root, text="Label 1", bg="lightblue")
label2 = tk.Label(root, text="Label 2", bg="lightgreen")
button1 = tk.Button(root, text="Button 1", bg="lightcoral")
entry1 = tk.Entry(root, bg="lightyellow")
entry2 = tk.Entry(root, bg="lightpink")

# グリッドに配置
label1.grid(row=0, column=0, sticky="ew")
label2.grid(row=0, column=1, sticky="ew")
button1.grid(row=1, column=0, columnspan=2, pady=10, sticky="ew")
entry1.grid(row=2, column=0, padx=5, sticky="ew")
entry2.grid(row=2, column=1, padx=5, sticky="ew")

# ウィンドウを表示
root.mainloop()
ウィンドウに合わせて動的に伸縮させる
stickyオプションだけでは、初期表示のウィンドウサイズに対して伸縮するのみである。実際にはウィンドウサイズが変更されたら、追従して大きくなってほしい。その場合はcolumnconfigure()/rowconfigure()を追加で設定する。
columnconfigure()/rowconfigure()
columnconfigure()/rowconfigure()を使うことでグリッドレイアウト内の各行列のサイズや振る舞いをカスタマイズすることができる。主なオプションは以下。
- weight:この列または行にどのくらいの追加スペースが伝播されるか
- minsize:最小のサイズ
- Pad:追加で許可されるスペースの量
先ほどのコードに以下を追加するとウィンドウサイズ(横方向)に追従するようになる。
# ウィンドウのサイズ変更に追従するように設定
root.columnconfigure(0, weight=1)
root.columnconfigure(1, weight=1)
root.rowconfigure(0, weight=1)
root.rowconfigure(1, weight=1)
root.rowconfigure(2, weight=1)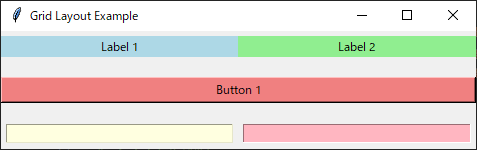
ここではTk()で作成したrootウィジェットのメンバ関数に対してcolumnconfigure設定しているが、例えばこれがネストされたFrameウィジェットの中のグリッドであれば、ルートのウィジェットとFrameウィジェットに対してそれぞれ設定することになる。
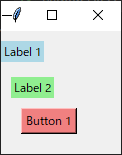
パディング(余白)を持たせる
grid()メソッドのpadxとpadyパラメータで余白を指定できる。これらのパラメータはウィジェットの周囲に追加される水平方向(padx)および垂直方向(pady)のパディングを制御する。
padx: ウィジェットの左右の端とグリッドセルの境界との間の水平方向のパディングを設定する。pady: ウィジェットの上下の端とグリッドセルの境界との間の垂直方向のパディングを設定する。
余白の例
余白の例のコード
パディングがわかりやすいように、stickyで左上に配置を寄せてパディング設定してある。
import tkinter as tk

root = tk.Tk()

label1 = tk.Label(root, text="Label 1", bg="lightblue")
label2 = tk.Label(root, text="Label 2", bg="lightgreen")
button1 = tk.Button(root, text="Button 1", bg="lightcoral")

 # 垂直方向に両方10パディング
label1.grid(sticky="nw", row=0, column=0, padx=0, pady=10)
# 水平方向に左端には10、右端には20のパディングを追加、垂直方向に両方5パディング
label2.grid(sticky="nw", row=1, column=0, padx=(10, 20), pady=5)
# 垂直方向に上端には5、下端には20のパディングを追加、水平方向に左右20パディング
button1.grid(sticky="nw", row=2, column=0, padx=20, pady=(5, 20))

root.mainloop()
ウィジェット内側のパディング
grid()メソッドのipadxとipadyを指定することで、ウィジェット内部のパディングを制御できる。
ipadx: ウィジェット内のテキストや内容の左右の端とウィジェットの境界との間の水平方向の内部パディングを設定する。ipady: ウィジェット内のテキストや内容の上下の端とウィジェットの境界との間の垂直方向の内部パディングを設定する。
内部にパディングのあるボタン
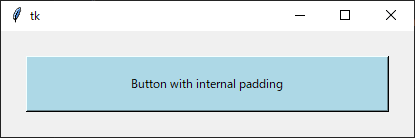
import tkinter as tk

root = tk.Tk()

button1 = tk.Button(root, text="Button with internal padding", bg="lightblue")
button1.grid(row=0, column=0, padx=25, pady=25, ipadx=100, ipady=15)

root.mainloop()
グリッド内で配置を寄せる
ウィンドウサイズに合わせるところで利用したstickyを使うことで、alignを指定したような配置にすることもできる。
左寄せ ”w”(west)
label1 = tk.Label(root, text="Left-aligned Label 1", bg="lightblue")
label1.grid(row=0, column=0, sticky="w")
右寄せ ”e”(east)
label1 = tk.Label(root, text="Right-aligned Label 1", bg="lightblue")
label1.grid(row=0, column=0, sticky="e")
上寄せ ”n”(north)
label1 = tk.Label(root, text="Top-aligned Label 1", bg="lightblue")
label1.grid(row=0, column=0, sticky="n")
下寄せ ”s”(south)
label1 = tk.Label(root, text="Bottom-aligned Label 1", bg="lightblue")
label1.grid(row=0, column=0, sticky="s")
ネストしたグリッドレイアウト
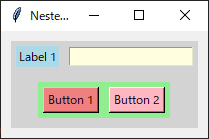
グリッドの中にグリッドを配置できる。例えば親ウィジェット内に別のフレームウィジェットを作成し、そのフレーム内でさらにウィジェットをグリッドレイアウトで配置できる。
以下のようなネストされたグリッドを構築してみる
- ウィンドウルートウィジェット
- 親Frameウィジェット ( ルートのrow=0, column=0 )
- Labelウィジェット ( 親Frameのrow=0, column=0 )
- Entryウィジェット ( 親Frameのrow=0, column=1 )
- 子Frameウィジェット ( 親Frameのrow=1, column=0, columnspan=2 )
- Buttonウィジェット ( 子Frameのrow=0, column=0 )
- Buttonウィジェット ( 子Frameのrow=0, column=1 )
- 親Frameウィジェット ( ルートのrow=0, column=0 )
ネストしたGridレイアウト画面例
ネストしたGridレイアウトのコード例
import tkinter as tk

root = tk.Tk()
root.title("Nested Grid Example")

# 親フレームを作成
parent_frame = tk.Frame(root, bg="lightgray")
parent_frame.grid(row=0, column=0, padx=10, pady=10)

# ラベルとエントリーを親フレーム内に配置(ネスト)
label1 = tk.Label(parent_frame, text="Label 1", bg="lightblue")
entry1 = tk.Entry(parent_frame, bg="lightyellow")
child_frame = tk.Frame(parent_frame, bg="lightgreen") # 子フレームを作成

# 親フレーム内のグリッド配置
label1.grid(row=0, column=0, padx=5, pady=5)
entry1.grid(row=0, column=1, padx=5, pady=5)
child_frame.grid(row=1, column=0, columnspan=2, pady=10)

# ボタンを子フレーム内に配置
button1 = tk.Button(child_frame, text="Button 1", bg="lightcoral")
button2 = tk.Button(child_frame, text="Button 2", bg="lightpink")

# 子フレーム内のグリッド配置
button1.grid(row=0, column=0, padx=5, pady=5)
button2.grid(row=0, column=1, padx=5, pady=5)

root.mainloop()